Overview
The Airis-C Multisensor and Power Control Unit (PCU) installation involves electrical work that must be performed by a qualified electrician. This guide provides supplementary installation information alongside the manufacturer's documentation included with the product.
Package contents
- Installation and user manuals
- Multisensor unit with mounting bracket
- 4 × AA batteries for the Multisensor
- 2 × mounting screws for the Multisensor
- Remote control with CR 2032 battery
- Power Control Unit (PCU)
- Warranty registration card
Installing the Power Control Unit (PCU)
Step 1: Select installation location
Suggested PCU positions include:
- Behind the oven (where a hob is located above a built-in oven).
- Under the cooker plinth.
- In a cupboard adjacent to the cooker.
- Near the floor behind a free-standing cooker.
Important: Do not install the PCU where it will be exposed to moisture or excessive heat.
Step 2: Open the PCU casing
Remove the four screws at each corner of the unit.
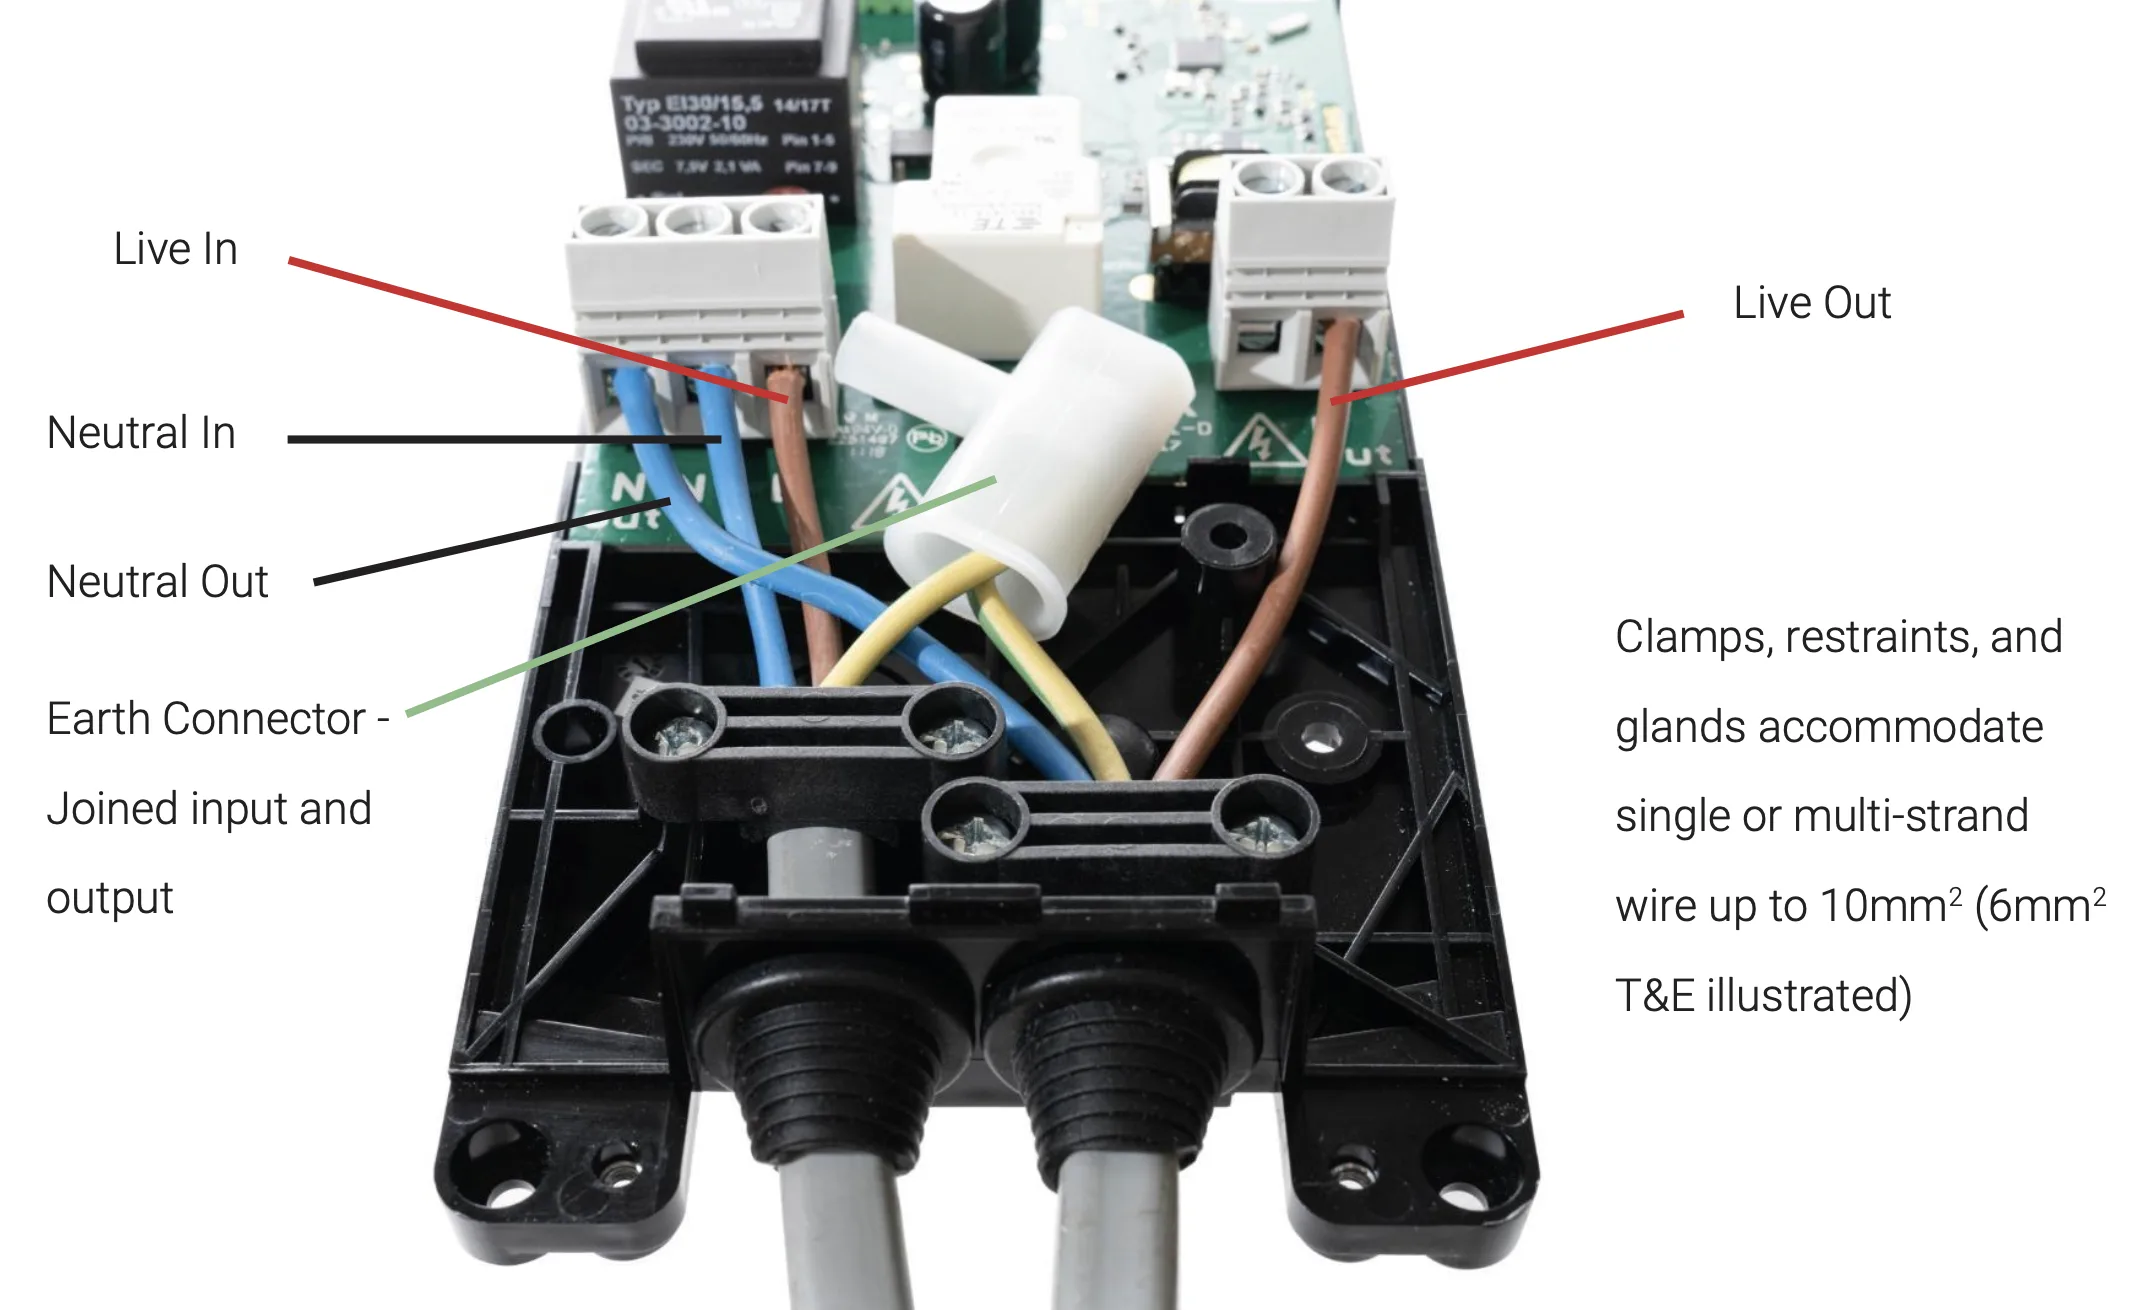
Step 3: Wire the PCU
Wire the PCU according to the provided wiring diagram.
Step 4: Close and mount
Replace the PCU casing and mount the unit in the selected position.
Installing the Airis-C Multisensor
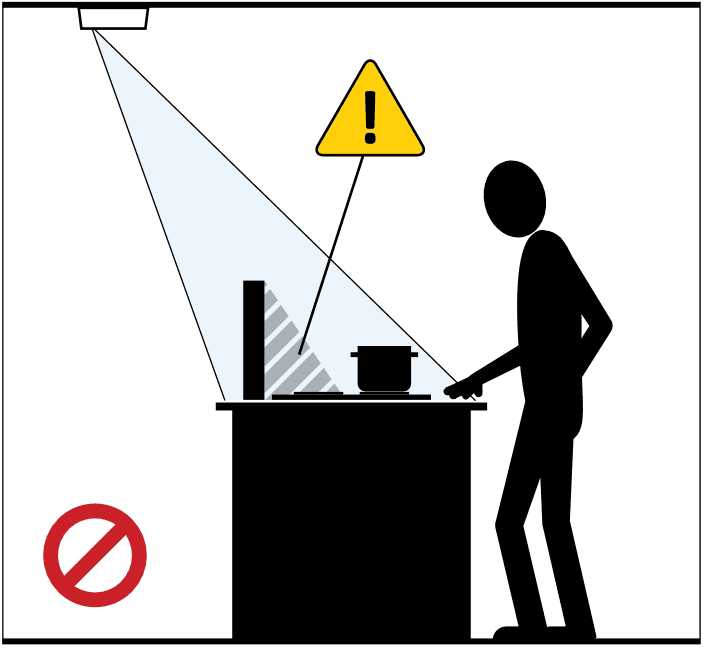
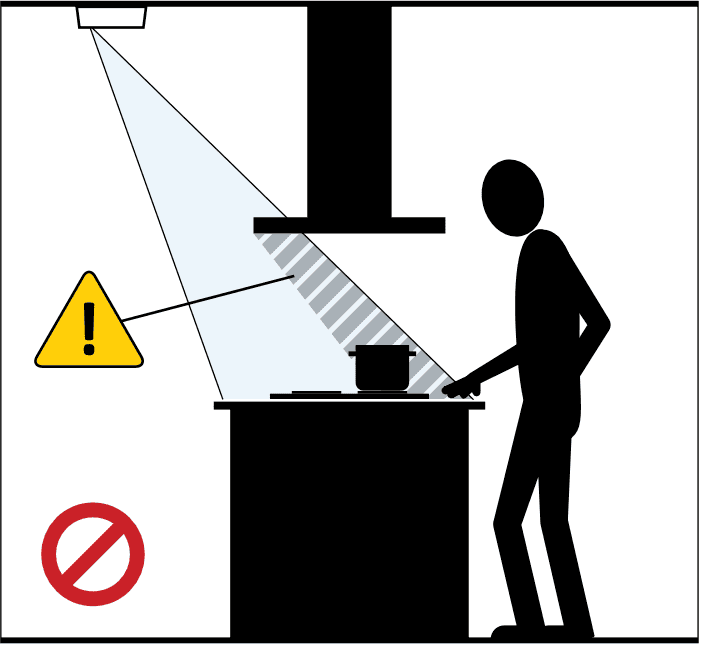
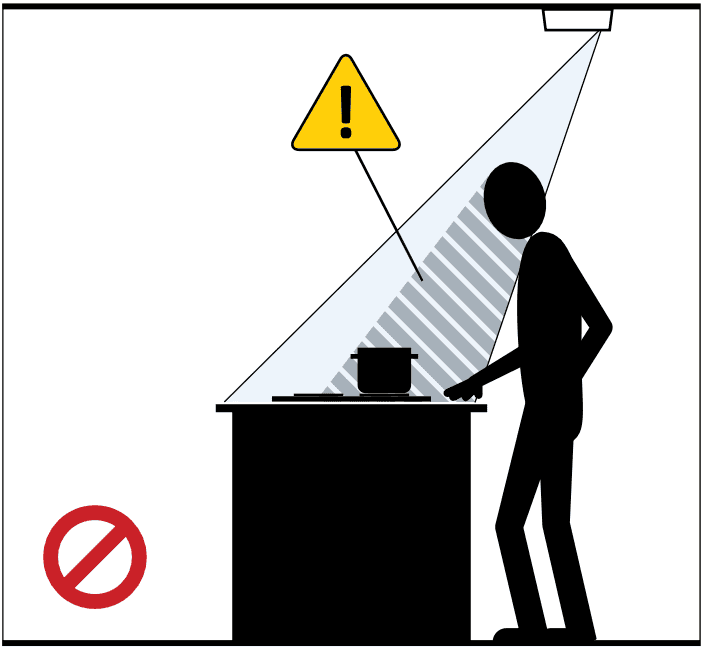
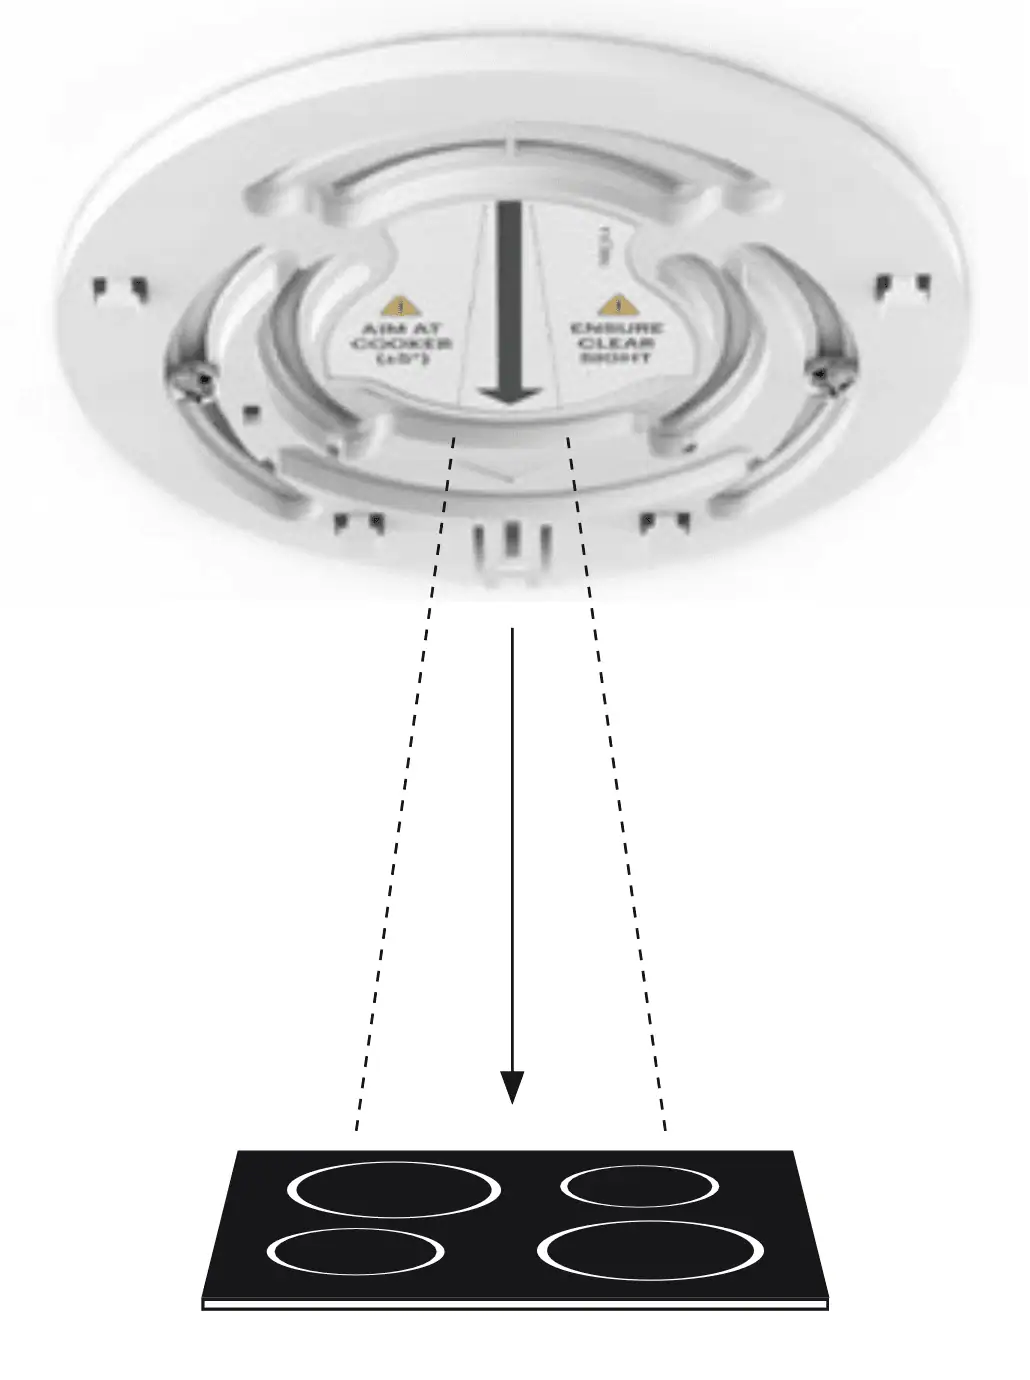
Critical requirement: Ensure the sensor unit has clear line of sight to the whole cooktop with no obstacles blocking its view. Incorrect installation may prevent the stove guard from reacting to cooking hazards.
Warning: Do not place hot items or appliances with hot surfaces (toasters, grills) near the cooktop, as they may interfere with the sensor.
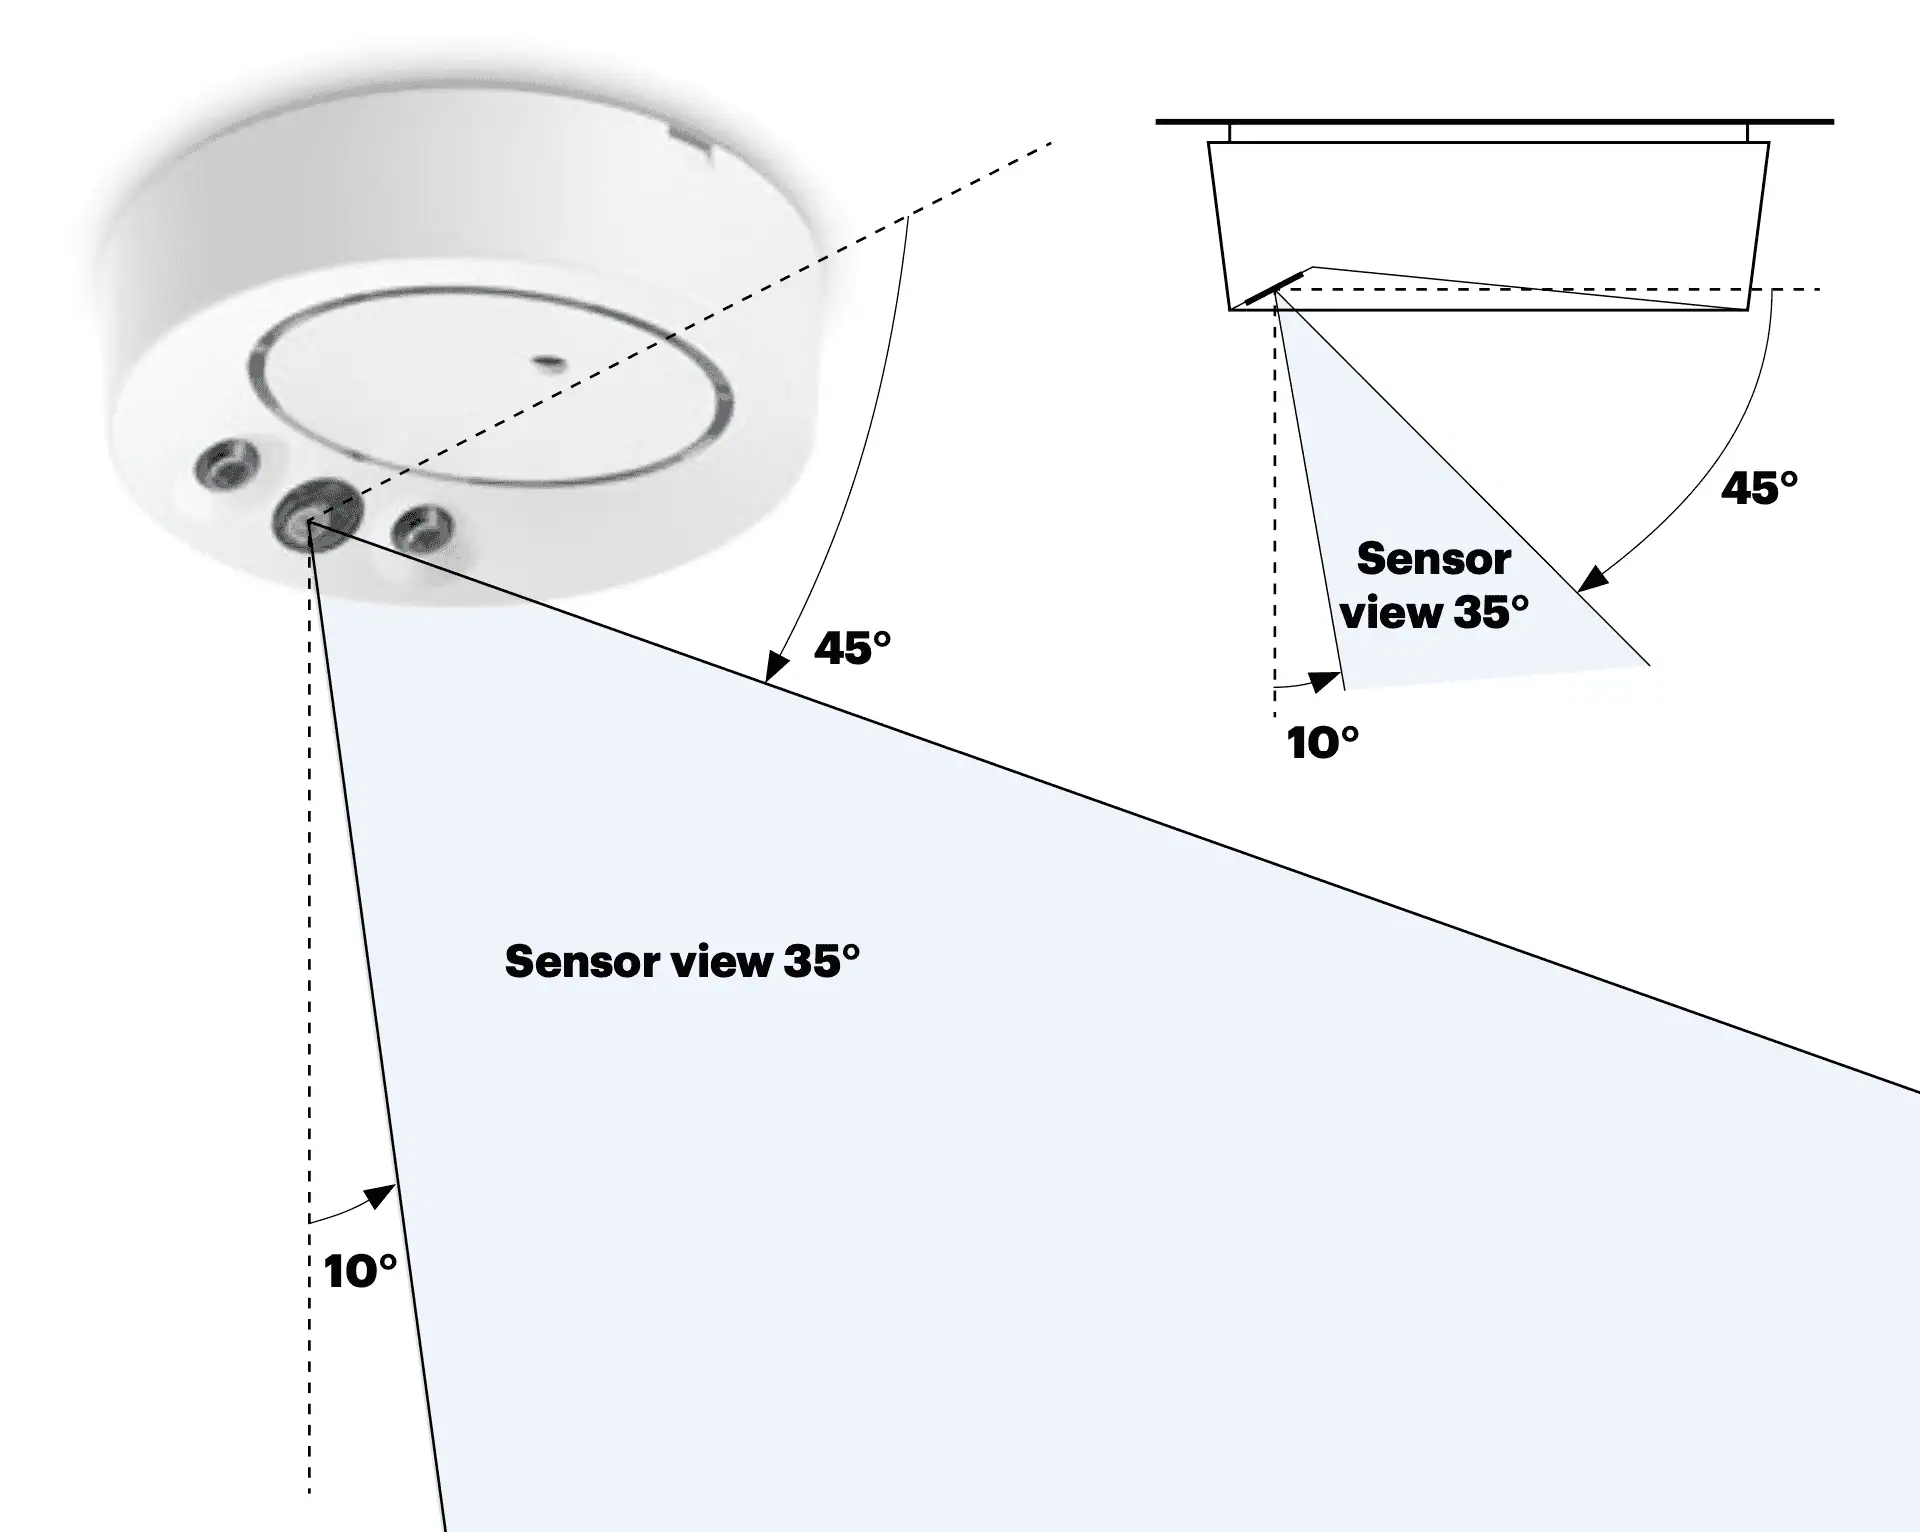
Step 1: Understand sensor direction and viewing angle
The sensor operates with a 35-degree field of view.
Step 2: Verify unobstructed view
Check for obstacles that could block the sensor's view:
Example 1: A tall object (e.g. a downdraft hood) blocking the sensor's sight to the cooktop.
Example 2: A cooker hood blocking the sensor's sight to the cooktop.
Example 3: A user blocking the sensor's sight to the cooktop.
Step 3: Select mounting based on ceiling angle
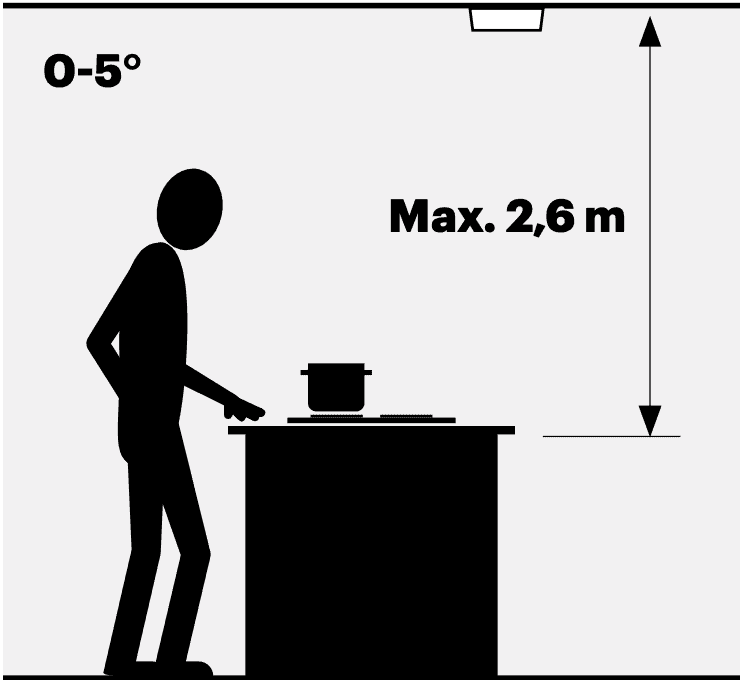
Levelled ceiling 0–5°
Follow the mounting instructions for levelled ceilings below.
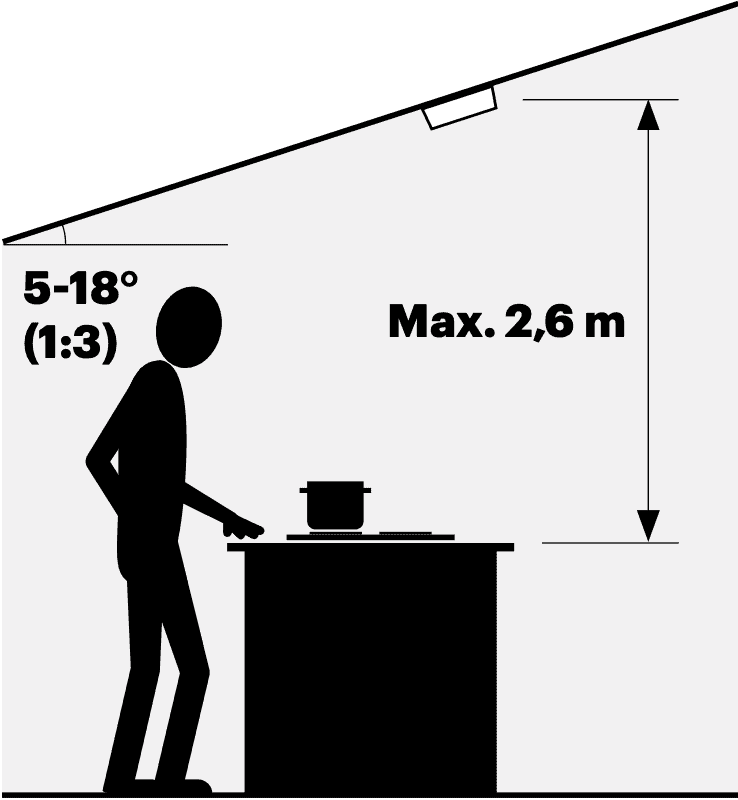
Sloped ceiling 5–18°
Follow the mounting instructions for sloped ceilings below.
Airis-C Multisensor mounting on levelled ceilings (0–5°)
Step 1: Mark the mounting location
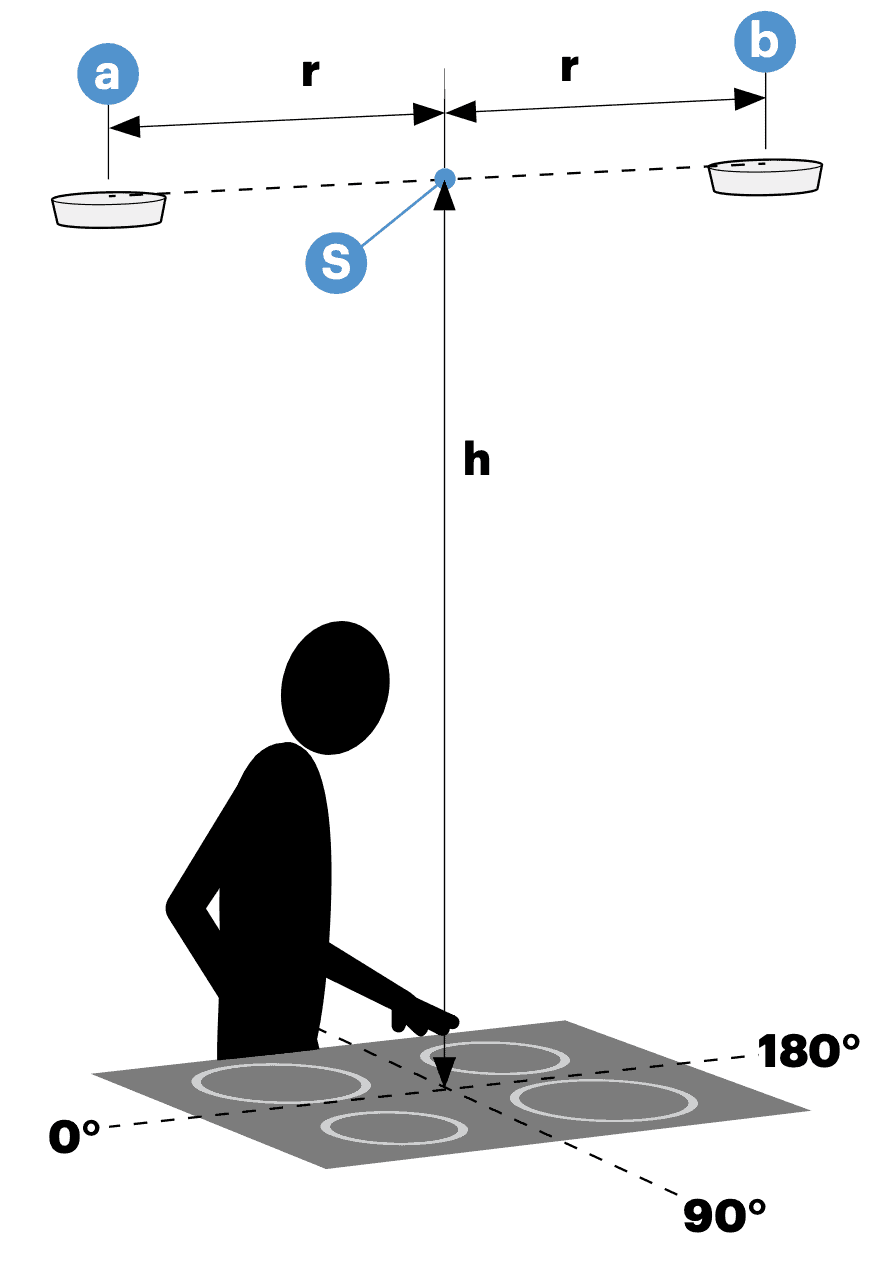
- Locate spot (S) on the ceiling directly above the cooktop centre.
- Measure the installation height (h).
- Mark the sensor location at distance (r) from centre spot (S) according to this table:
| Height (h) | R min. | R recommended | R max. |
|---|
| 1.4–1.8m | 0.5m | 0.7m | 0.9m |
| 1.8–2.1m | 0.5m | 0.7m | 1.3m |
| 2.1–2.6m | 0.6m | 0.7m | 1.6m |
The recommended location is on either side (0° or 180°) of the cooktop.
Recommendation: Mount the sensor unit perpendicular (0°, 90°, 180° or 270°) to the cooktop. Other directions are permitted if the sensor maintains clear sight to the cooktop when someone is using the cooker.
Step 2: Install the mounting bracket
- Remove the mounting bracket from the sensor unit.
- Install the bracket in the selected location and loosely tighten the mounting screws.
- Point the arrow on the mounting bracket toward the cooktop centre.
- Tighten the mounting screws.
Proceed to the final installation steps below.
Airis-C Multisensor mounting on sloped ceilings (5–18°)
Step 1: Mark the mounting location
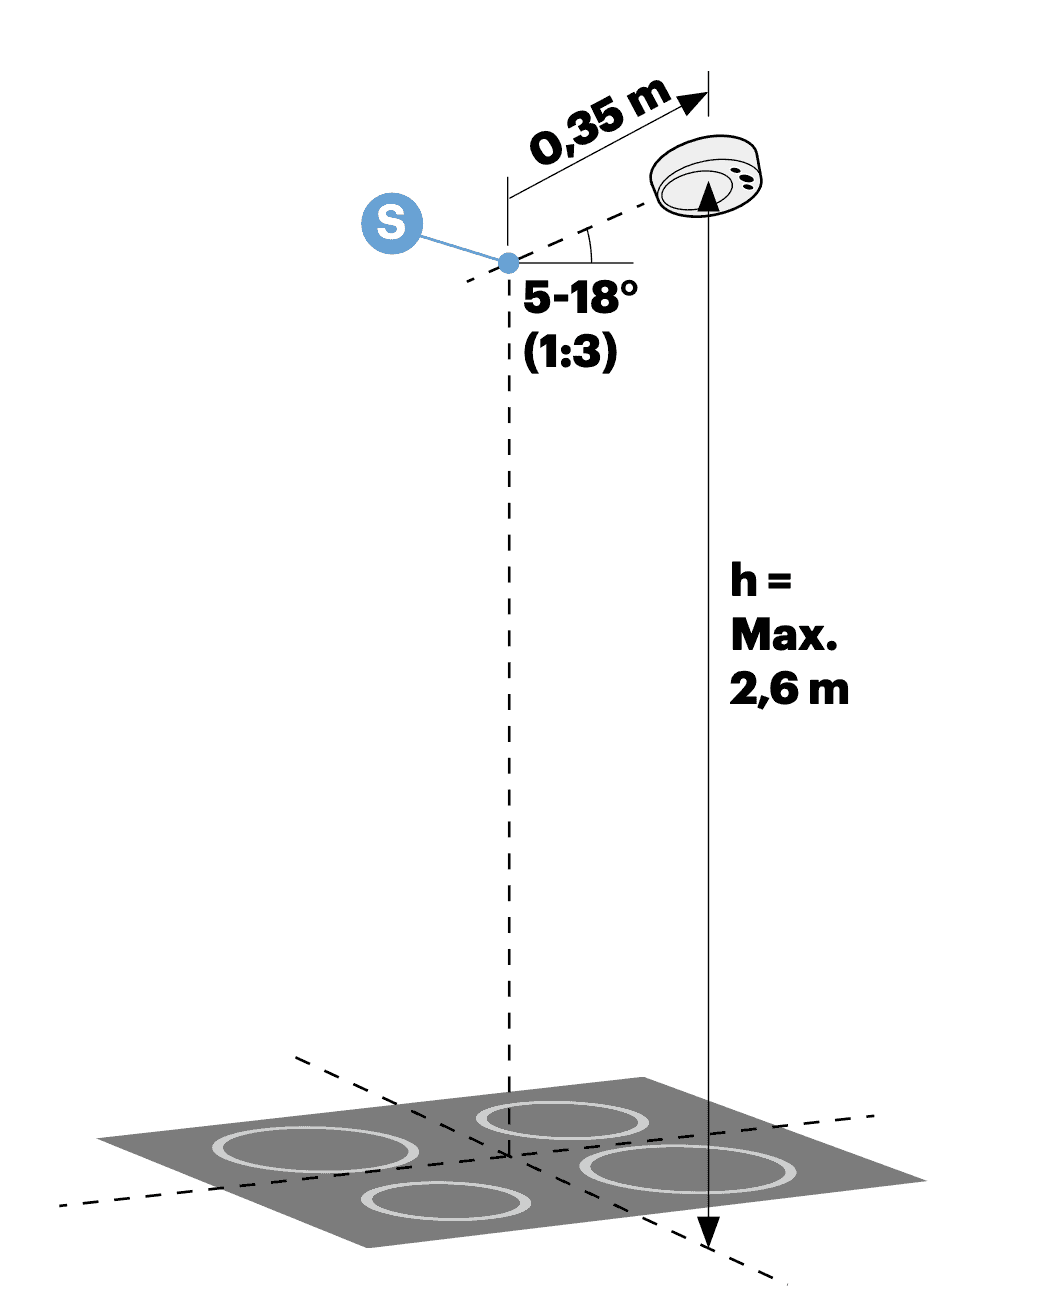
- Locate spot (S) on the ceiling directly above the cooktop centre.
- Mark the sensor location by measuring 0.35m from spot (S) upwards on the sloped ceiling.
- Ensure the vertical installation height (h) between the cooktop and the mounting bracket centre does not exceed 2.6m.
Note: The maximum allowed ceiling slope is 18° (1:3).
Step 2: Install the mounting bracket
- Remove the mounting bracket from the sensor unit.
- Install the bracket in the selected location and loosely tighten the mounting screws.
- Point the arrow on the mounting bracket toward the cooktop centre.
- Tighten the mounting screws.
Multisensor installation final steps
Step 1: Remove battery slip
Remove the battery slip from the Multisensor unit.
Step 2: Set the alarm limit
The default alarm limit setting is 8 (range 3–10), recommended for installation heights of 1.6–1.7m. To adjust the alarm limit:
- Press the adjustment button ❷ for 5 seconds to enter manual adjustment mode.
- Set the alarm limit per the installation manual's chapter on Manual Adjustment Mode.
Aurora automatically recognises the cooker type during cooking to minimise false alarms. Manually selecting the cooker type (per page 29 of the installation manual) may speed up auto-recognition.
Step 3: Mount the sensor unit
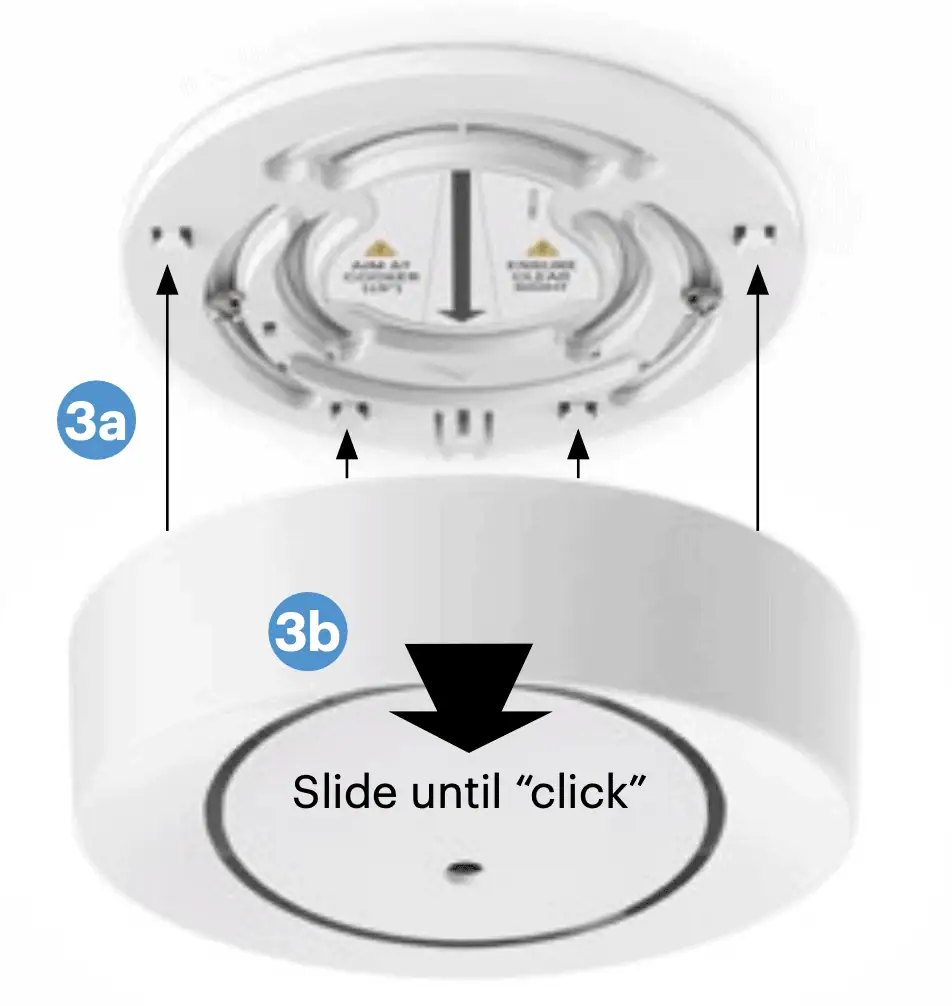
Guide the sensor unit onto the four pins of the mounting bracket and slide gently until it locks in place.
Step 4: Check working order
- Ensure the cooker is at room temperature.
- Press the OK button for three seconds; the indicator light will blink orange.
- Place an empty pan on a cooking plate at medium to high power (e.g. 8/10).
- Move at least two metres away from the cooker to avoid disturbing the test.
- Within two minutes, the sensor unit should give an audible signal and indicate the test result:
- Success: the indicator light blinks green and cooker power switches off.
- Failure: the indicator light blinks red and cooker power switches off, or cooker power does not switch off within two minutes.
- Press the OK button to finish the test.


 Flexible mounting options
 Trusted by 25 major accommodation providers